Tag: dremel-tool

  • 5 Easy Ways to Remove a Rounded Nut

    5 Easy Ways to Remove a Rounded Nut

    5 Easy Ways to Remove a Rounded Nut

    $title$ Attempting to take away a rounded nut generally is a irritating expertise. The rounded edges make it troublesome to get a very good grip on the nut, and conventional instruments like wrenches and sockets usually slip off. Nevertheless, there are a couple of methods you’ll be able to attempt to take away a rounded nut with out damaging it or the encircling elements. First, strive utilizing a pair of vice grips to get a greater grip on the nut. If that does not work, you’ll be able to strive utilizing a chisel and hammer to rigorously break the nut free. Lastly, if all else fails, you should utilize a drill to drill a small gap within the nut after which use an easy-out to take away it.

    Typically, one of the best ways to take away a rounded nut is to make use of a pair of vice grips. Vice grips are a kind of pliers which have a serrated jaw that may grip onto rounded surfaces. To make use of vice grips to take away a rounded nut, merely place the jaws of the vice grips on the nut and squeeze. The serrated jaws will dig into the nut and offer you a very good grip. After you have a very good grip on the nut, you’ll be able to flip it with a wrench or socket.

    In some circumstances, utilizing vice grips will not be sufficient to take away a rounded nut. If the nut is just too tight or if the vice grips should not in a position to get a very good grip, it’s possible you’ll want to make use of a chisel and hammer to rigorously break the nut free. To do that, place the chisel on the sting of the nut and faucet it with a hammer. The chisel will progressively break the nut free, permitting you to take away it along with your fingers or a pair of pliers.

    Take away a Rounded Nut

    Eradicating a rounded nut generally is a difficult activity, however there are a number of efficient strategies you’ll be able to strive. This is a step-by-step information that can assist you out:

    1. Use a Nut Extractor: A nut extractor is a specifically designed device that grips the rounded nut and means that you can take away it. Merely insert the appropriate-sized extractor into the nut and switch it with a wrench.
    2. Weld a Nut on Prime: You probably have entry to a welder, you’ll be able to weld a brand new nut on prime of the rounded one. As soon as the weld has cooled, you should utilize a wrench to take away each nuts collectively.
    3. Use Vise-Grip Pliers: Vise-grip pliers present a powerful grip on the rounded nut. Place the jaws of the pliers over the nut and squeeze them tightly. Rotate the pliers to loosen the nut.
    4. Grind Two Flats: Utilizing a grinder, rigorously grind two flats on reverse sides of the rounded nut. These flats will present a grip for a wrench or pliers.
    5. Use a Chilly Chisel: Place a chilly chisel in opposition to the nut’s aspect and gently faucet it with a hammer. The chisel will create a notch within the nut, offering a grip for a wrench.

    Folks Additionally Ask About How To Take away A Nut That Is Rounded

    How do I take away a rounded nut with out welding?

    You should use a nut extractor, vise-grip pliers, or grind two flats on the nut to create a grip for a wrench or pliers.

    Can I exploit WD-40 to loosen a rounded nut?

    WD-40 will help loosen the nut, nevertheless it’s not an alternative choice to the strategies described above.

    What’s the most secure technique to take away a rounded nut?

    Utilizing a nut extractor is the most secure and handiest technique for eradicating a rounded nut.

  • How To Put A Hole In A Shell

    Earlier than trying to place a gap in a shell, you will need to first don applicable security gear. This consists of security glasses, gloves, and a mud masks. The method of drilling a gap in a shell can create mud and small items of shell that may be dangerous if inhaled or come into contact together with your eyes or pores and skin. After you have the correct security gear, you possibly can start the method of drilling a gap within the shell.

    To drill a gap in a shell, you will want a drill with a bit that’s the applicable dimension for the outlet you wish to create. Begin by making a small pilot gap within the shell. It will assist to forestall the drill bit from slipping and damaging the shell. After you have made a pilot gap, you possibly can then drill the outlet to the specified dimension. Make sure you use a gradual pace and light-weight strain when drilling the outlet. It will assist to forestall the shell from cracking or breaking. After you could have drilled the outlet, you possibly can then use a file or sandpaper to easy the perimeters of the outlet.

    There are a number of alternative ways to place a gap in a shell. A technique is to make use of a drill. One other approach is to make use of a Dremel device. And at last, you too can use a hammer and nail. The strategy you select will rely upon the dimensions and thickness of the shell. If you’re drilling a gap in a small, skinny shell, you should use a hand drill. If you’re drilling a gap in a big, thick shell, you will want to make use of an influence drill. Whatever the technique you select, make sure you put on security glasses and gloves to guard your self from flying particles.

    Selecting the Proper Shell

    Deciding on the suitable shell for drilling is essential to make sure a profitable end result. Think about the next components when selecting a shell:

    • Kind of Shell: Numerous kinds of shells, resembling seashells, conch shells, and abalone shells, have totally different textures and thicknesses. Select a shell that’s sturdy sufficient to face up to the drilling course of with out cracking or splintering.
    • Dimension and Form: The scale and form of the shell will decide the dimensions and placement of the outlet. Think about the supposed use of the outlet and choose a shell that gives adequate house for the outlet and any gildings.
    • Thickness: The thickness of the shell is essential for each drilling and sturdiness. Thicker shells could require an extended drilling time, however they’ll present a extra sturdy gap. Keep away from shells which are too skinny as they could crack or puncture simply.
    • Floor Texture: Shells with easy surfaces are simpler to drill than these with textured surfaces. Easy surfaces enable for a extra exact gap placement and cut back the chance of the drill bit slipping.
    • Presence of Inner Obstacles: Some shells could have inner obstacles, resembling pearls or barnacles, which may intrude with the drilling course of. Study the shell fastidiously earlier than deciding on it to keep away from potential problems.
    Shell Kind Appropriate for Drilling
    Seashells Sure
    Conch Shells Sure
    Abalone Shells Sure
    Oyster Shells Sure (Skinny shells)
    Clamshells No (Too fragile)

    Deciding on and Utilizing the Acceptable Drill Bit

    Selecting the best drill bit is essential for efficiently drilling holes in shells with out damaging them. Listed below are some components to contemplate:

    Materials of Shell: Totally different shell supplies have various hardness. For tougher shells (e.g., abalone, conch), a diamond-tipped or tungsten carbide drill bit is really useful. For softer shells (e.g., scallop, sand greenback), an ordinary metal or cobalt bit can suffice.

    Thickness of Shell: The drill bit ought to be barely smaller in diameter than the specified gap dimension. For thinner shells, a smaller diameter bit is important to keep away from cracking or splitting. For thicker shells, a bigger diameter bit can be utilized.

    Gap Location: If the outlet is being drilled close to the sting of the shell, use a smaller diameter bit to attenuate the chance of chipping. For holes drilled within the heart of the shell, a bigger diameter bit can be utilized.

    Drill Bit Velocity: Drill at a gradual pace (500-1,000 RPM) to forestall overheating and cracking. Use a drill press or a handheld drill with a variable pace setting to manage the drill pace.

    Shell Materials Drill Bit Materials
    Onerous shells (abalone, conch) Diamond-tipped or tungsten carbide
    Smooth shells (scallop, sand greenback) Metal or cobalt

    Drilling the Gap Safely and Successfully

    To make sure a clear and protected drilling course of, comply with these pointers:

    1. Select the Proper Drill Bit: Use a carbide-tipped or diamond-coated drill bit particularly designed for drilling shells. These bits present precision and sturdiness.
    2. Safe the Shell Correctly: Clamp the shell firmly in a vise or use a workbench with a cradle to forestall it from transferring throughout drilling.
    3. Use Excessive-Velocity Drills: Rotary instruments or hand drills with excessive pace settings (round 5,000-10,000 RPM) guarantee clear cuts.
    4. Drill in Brief Bursts with Mild Strain: Apply light strain whereas drilling and launch it periodically to forestall overheating and cracking.

    To drill a gap in a bigger shell (3 inches or extra in diameter), take into account the next extra strategies:

    • Begin with a Small Pilot Gap: Drill a small pilot gap (1/16 inch) on the desired location to information the bigger bit.
    • Drill at an Angle: Drill barely angled holes in direction of the middle of the shell to cut back chipping and breakage.
    • Use a Chopping Fluid: Apply a lubricating reducing fluid, resembling water or oil, to chill the drill bit and stop injury.
    • Test the Gap Usually: Cease drilling and verify the outlet periodically to make sure it meets the specified dimension and site.
    Drill Bit Dimension Beneficial Shell Thickness
    1/16 inch As much as 1 inch
    1/8 inch 1-2 inches
    1/4 inch 2-3 inches

    By following these directions, you possibly can safely and successfully drill holes in numerous kinds of shells.

    Smoothing and Ending the Edges

    After you have efficiently carved your gap within the shell, you will need to easy and end the perimeters to create a clear and professional-looking consequence.

    Listed below are some strategies you should use to easy the perimeters:

    • Sandpaper: Use fine-grit sandpaper to softly sand the perimeters of the outlet, beginning with a coarser grit (e.g., 100-220) and dealing your approach as much as a finer grit (e.g., 400-1000) for a easy end.
    • Emery fabric: Emery fabric is a kind of abrasive fabric that may be wrapped round a small dowel or stick. Use it to softly rub the perimeters of the outlet in a round movement, once more beginning with a coarser grit and graduating to a finer grit.
    • Dremel device: When you have entry to a Dremel device, you should use a sanding attachment or a small grinding bit to easy and form the perimeters extra exactly.
    • Knife or razor blade: For extra intricate particulars, you should use a pointy knife or a razor blade to fastidiously shave away any tough edges or imperfections.
    • Buffing: As soon as the perimeters are easy, you should use a sprucing fabric or a buffing wheel with a sprucing compound to provide them a shiny end.

    Tip: All the time put on security glasses and a mud masks when working with abrasive supplies.

    Desk of Totally different Smoothing Methods

    Methodology Professionals Cons
    Sandpaper Versatile and cheap Time-consuming for big holes
    Emery fabric Exact and permits for detailed shaping Might be costlier
    Dremel device Quick and efficient for exact work Requires specialised tools
    Knife or razor blade Good for intricate particulars Requires regular hand and warning
    Buffing Creates a shiny end Might require a number of steps

    Defending the Shell from Harm

    Shells are delicate and might simply break if not dealt with with care. When drilling a gap in a shell, you will need to take steps to guard the shell from injury.

    Listed below are some suggestions:

    • Select the fitting drill bit. A drill bit that’s too giant will injury the shell. A drill bit that’s too small won’t create a clear gap.
    • Use a gradual drill pace. Drilling too shortly will create warmth and injury the shell.
    • Apply strain evenly. Don’t press down too exhausting on the drill, as this will crack the shell.
    • Drill in a well-ventilated space. The mud from drilling will be dangerous if inhaled.
    • Put on security glasses. The drill bit can break or fly off, so you will need to shield your eyes.
    • Use a drill press or a hand-held drill with a drill press attachment. It will assist to maintain the drill bit regular and stop the shell from transferring.
    • Drill a pilot gap first. It will assist to forestall the drill bit from skipping and damaging the shell.
    • Drill in brief bursts. It will assist to forestall the drill bit from overheating and damaging the shell.
    • Cease drilling in the event you really feel any resistance. This might point out that the drill bit is hitting one thing exhausting, resembling a bit of steel or a stone. In case you proceed to drill, you would injury the shell.

    Utilizing a Diamond Drill Bit for Precision

    For essentially the most exact and delicate drilling, a diamond drill bit is the best alternative. Observe these steps for knowledgeable outcomes:

    1. Use a Dremel Instrument or Drill Press

    A Dremel device or drill press offers the steadiness and management wanted for precision drilling.

    2. Safe the Shell

    Clamp the shell securely in a vise or maintain it firmly with pliers.

    3. Mark the Drilling Level

    Mark the precise spot the place you wish to drill with a pencil or scribe.

    4. Select the Right Bit Dimension

    Choose a diamond drill bit barely smaller than the specified gap dimension.

    5. Lubricate the Bit

    Apply a drop of water or reducing oil to the drill bit to cut back friction and stop overheating.

    6. Begin Drilling Slowly

    Start drilling at a low pace and progressively enhance the pace as you drill.

    7. Preserve Regular Strain and Cool the Bit

    Apply constant strain to the drill whereas drilling. Take breaks to dip the bit in water and permit it to chill.

    Tip for Avoiding Cracks Methodology
    Drill from the within out Begin the outlet from the interior floor of the shell to forestall cracks from radiating outward.
    Use a thicker shell Select a shell with a thicker wall to offer extra assist and cut back the chance of cracking.
    Apply light strain Keep away from extreme strain on the drill bit, as this will trigger the shell to crack.

    Supplies Wanted

    – Shell
    – Drill or dremel
    – Drill bit or reducing disc
    – Security glasses
    – Gloves

    Steps

    1. Select the Proper Shell

    Choose a shell that’s thick sufficient to assist a gap with out cracking. Keep away from shells with skinny partitions or seen cracks.

    2. Resolve on the Gap Dimension

    Decide the diameter and depth of the outlet you want. Think about the supposed objective of the outlet (e.g., for stringing jewellery or hanging it on a wall).

    3. Put on Protecting Gear

    All the time put on security glasses and gloves when drilling shells. It will shield you from flying particles and cuts.

    4. Safe the Shell

    Use a clamp or vise to carry the shell securely in place. It will stop it from transferring or vibrating throughout drilling.

    5. Mark the Gap Location

    Use a pencil or marker to mark the specified gap location on the shell. It will guarantee accuracy.

    6. Begin Drilling

    Use a drill or dremel with a diamond-tipped drill bit or reducing disc. Begin drilling slowly and progressively enhance pace as wanted.

    7. Apply Water

    Optionally, apply water to the drill bit to cut back friction and stop the shell from overheating.

    8. Take Breaks

    Let the drill calm down each couple of minutes to forestall injury.

    9. Easy the Edges

    As soon as the outlet is drilled, use sandpaper or a file to easy any sharp edges.

    10. Ideas for Optimum Outcomes

    – Use sharp drill bits or reducing discs for cleaner holes.
    – Keep away from drilling too quick to forestall chipping or cracking.
    – Help the shell correctly to attenuate vibration.
    – In case you encounter resistance whereas drilling, cease and verify the drill bit for put on.
    – Apply on spare shells earlier than drilling your prized specimens.
    – In case you’re drilling a big gap, use a step drill bit to progressively enhance the outlet dimension.
    – For delicate shells, use a hand drill with a small drill bit.
    – In case you’re hanging the shell, drill a small gap on the high for string or wire.
    – Seal the outlet with a transparent glue or epoxy to forestall water injury.
    – Experiment with totally different drill speeds and drill bit sizes to seek out the optimum mixture on your particular shell and desired gap.

    How To Put A Gap In A Shell

    There are a number of alternative ways to place a gap in a shell. A technique is to make use of a drill. First, make it possible for the shell is securely clamped in place. Then, use a drill bit that’s barely smaller than the specified gap dimension. Drill slowly and thoroughly, and make sure you maintain the drill bit perpendicular to the shell. As soon as the outlet is drilled, use a file or sandpaper to easy the perimeters.

    One other approach to put a gap in a shell is to make use of a Dremel device. A Dremel device is a small, handheld rotary device that can be utilized for quite a lot of duties, together with drilling holes. To make use of a Dremel device to place a gap in a shell, first safe the shell in place. Then, use a Dremel drill bit that’s barely smaller than the specified gap dimension. Drill slowly and thoroughly, and make sure you maintain the drill bit perpendicular to the shell. As soon as the outlet is drilled, use a file or sandpaper to easy the perimeters.

    In case you don’t have entry to a drill or a Dremel device, you too can put a gap in a shell utilizing a nail. To do that, first warmth the nail over a flame. Then, fastidiously press the recent nail into the shell. The nail will soften the shell and create a gap. As soon as the outlet is made, use a file or sandpaper to easy the perimeters.

    Folks Additionally Ask About How To Put A Gap In A Shell

    What’s one of the best ways to place a gap in a shell?

    One of the simplest ways to place a gap in a shell will depend on the dimensions of the outlet and the kind of shell. For small holes, a drill or a Dremel device is an efficient choice. For bigger holes, a nail can be utilized.

    How do I make a clear gap in a shell?

    To make a clear gap in a shell, use a drill bit that’s barely smaller than the specified gap dimension. Drill slowly and thoroughly, and make sure you maintain the drill bit perpendicular to the shell. As soon as the outlet is drilled, use a file or sandpaper to easy the perimeters.

    Can I exploit a nail to place a gap in a shell?

    Sure, you should use a nail to place a gap in a shell. To do that, first warmth the nail over a flame. Then, fastidiously press the recent nail into the shell. The nail will soften the shell and create a gap. As soon as the outlet is made, use a file or sandpaper to easy the perimeters.

  • 5 Easy Ways to Remove a Rounded Nut

    5 Easy Steps: How To Cut Tile With A Dremel Tool

    5 Easy Ways to Remove a Rounded Nut

    Embark on a transformative journey as you uncover the artwork of reducing tile with the precision and flexibility of a Dremel instrument. Unleash your internal artist and convey your tiling desires to life with this groundbreaking approach.

    Step into the realm of easy tiling, the place intricate designs and seamless transitions effortlessly merge. The Dremel instrument, a grasp of precision, transforms tile reducing from a frightening job into an pleasing and empowering expertise. Its compact measurement and ergonomic design grant you final management, permitting you to execute intricate cuts with unparalleled accuracy. Whether or not you are a seasoned professional or a budding DIY fanatic, put together to raise your tiling recreation to outstanding heights.

    Embrace the ability of the Dremel instrument as your gateway to boundless creativity. With its versatility as your ally, you may conquer intricate mosaic designs, effortlessly lower curves and angles, and even deal with intricate inlays. The Dremel instrument empowers you to remodel bizarre tiles into extraordinary masterpieces, restricted solely by the boundaries of your creativeness. Put together to redefine the artwork of tiling, one lower at a time, and witness the beautiful outcomes that await you.

    How To Cut Tile With A Dremel Tool

    Preparation and Supplies

    Earlier than starting, it is essential to assemble the required supplies and put together the work space for optimum reducing situations. Here is an expanded description of preparation steps:

    Security Precautions

    Prioritize security by carrying protecting gear reminiscent of gloves, eye safety, and a mud masks. Work in a well-ventilated space to reduce mud publicity.

    Workspace Setup

    Set up a clear and secure workspace with ample lighting. Safe the tile firmly on a flat, non-slip floor to forestall motion throughout reducing.

    Materials Choice

    Select an appropriate tile cutter blade in your particular kind of tile. Ceramic and porcelain tiles require diamond-tipped blades, whereas softer supplies reminiscent of glass or PVC could also be lower with tungsten carbide blades.

    Dremel Instrument Preparation

    Mount the chosen reducing blade on the Dremel instrument and alter the velocity setting to the really helpful vary for the tile materials. Think about using a reducing information or jig to make sure precision and forestall uneven cuts.

    Marking the Reduce

    Clearly mark the supposed reducing line on the tile utilizing a pencil or marking instrument. Make sure the blade is perpendicular to the marked line to attain a clear and exact lower.

    Extra Instruments and Supplies

    Extra instruments and supplies could also be required, reminiscent of:

    Materials Objective
    Grinding stone Smoothing and shaping lower edges
    Sandpaper Refining and sprucing lower surfaces
    Water or coolant spray Cooling the blade throughout prolonged reducing to forestall overheating

    Choosing the Proper Dremel Accent

    Selecting the suitable Dremel accent is essential for efficient tile reducing. Listed here are the important thing components to think about:

    Blade Sort

    Dremel presents a variety of blade varieties particularly designed for reducing tile. Choose the suitable kind primarily based on the fabric and thickness of the tile:

    • Diamond Blade: For reducing porcelain, ceramic, and glass tiles
    • Tungsten Carbide Blade: For reducing ceramic and softer tiles
    • Carbide Grit Blade: For reducing thicker porcelain and ceramic tiles

    Blade Measurement

    The blade measurement determines the reducing depth and capability. Select a blade diameter that’s appropriate for the thickness of the tile being lower. A bigger blade measurement permits for deeper cuts.

    Blade Form

    Dremel blades come in numerous shapes, every offering particular benefits:

    • Segmented Blade: For quick and environment friendly straight cuts
    • Notched Blade: For exact curved or intricate cuts
    • Turbo Blade: For reducing via laborious supplies like porcelain

    Blade Arbor

    The blade arbor connects the blade to the Dremel instrument. Make sure the blade arbor is suitable with the precise Dremel attachment getting used.

    The next desk summarizes the blade kind suggestions for various tile supplies:

    Tile Materials Blade Sort
    Glass Diamond Blade
    Porcelain Diamond Blade, Carbide Grit Blade
    Ceramic Diamond Blade, Tungsten Carbide Blade

    Organising the Dremel Instrument

    Getting ready your Dremel instrument for tile reducing is essential for reaching exact and secure outcomes. Here is a step-by-step information to arrange your instrument accurately:

    1. Select the Acceptable Slicing Bit

    Choose a diamond-tipped reducing wheel or bit particularly designed for tile reducing. These bits present a clear and environment friendly lower on ceramic and porcelain tiles.

    2. Mount the Slicing Bit

    Insert the reducing bit into the collet of the Dremel instrument and tighten it securely utilizing the included wrench. Be certain that the bit is held firmly and there’s no wobble or play.

    3. Modify the Pace and Angle

    Setting the optimum velocity and angle for tile reducing is important. Begin with a decrease velocity of round 10,000 to fifteen,000 RPM to keep away from chipping or shattering the tile. Progressively enhance the velocity as wanted to attain a easy lower.

    Maintain the Dremel instrument at a 45-degree angle relative to the tile floor. Sustaining this angle ensures a clear and exact lower alongside the specified line.

    Parameter Really useful Setting
    Slicing Bit Diamond-tipped reducing wheel or bit
    Pace 10,000 to fifteen,000 RPM
    Angle 45 levels relative to the tile floor

    Dry-Becoming the Tiles

    Earlier than reducing the tiles, it is essential to dry-fit them to make sure correct alignment and to establish any needed changes. Here is an in depth information to dry-fitting tiles:

    1. Structure the Tiles:

    Prepare the tiles on the specified floor, holding in thoughts any patterns or designs. Place the tiles loosely with out making use of adhesive or thinset.

    2. Align the Tiles:

    Use a degree and measuring tape to make sure that the tiles are degree and aligned with one another. Modify the place of every tile as wanted to create a straight and even floor.

    3. Measure and Mark:

    Determine any areas the place tiles should be lower to suit round obstacles or corners. Use a pencil or marking instrument to point the precise measurement for reducing.

    4. Dry-Match the Cuts:

    Utilizing a dry-fit instrument or scrap items of cardboard, simulate the cuts that may should be made. This lets you visualize the ultimate look and make any needed changes to the measurements marked in step 3.

    Here is a step-by-step information to dry-fitting the cuts:

    1. Create a Dry-Match Instrument: Reduce a bit of cardboard or plywood to the identical measurement because the tile. Use a pencil to hint the form of the lower space onto the cardboard.
    2. Dry-Match the Instrument: Place the dry-fit instrument over the tile and align it with the marked lower space. Modify the instrument’s place to simulate the supposed lower.
    3. Examine and Modify: Observe the match of the dry-fit instrument. Make any needed changes to the marked measurement on the tile to make sure a exact match.
    4. Repeat for Different Cuts: Comply with the identical course of for every other cuts that should be made.

    Marking and Slicing Information

    Upon getting a clear tile and a gentle hand, it is time to mark and lower your tile. Here is a step-by-step information that can assist you obtain exact and clear cuts:

    1. Measure and Mark the Tile

    Use a measuring tape and a pencil or a chalk pencil to mark the world you need to lower on the tile. For straight cuts, use a straight edge to align your mark. For curved cuts, use a versatile measuring tape or a template.

    2. Rating the Tile

    Maintain the Dremel Instrument at a low angle in opposition to the marked line and gently rating the tile. Don’t press too laborious, as this may crack the tile. Use mild, even strain to create a rating line.

    3. Break the Tile

    Place the scored tile over the sting of a counter or a tile cutter. Use a instrument or your fingers to softly press down on the unscored facet of the tile, forcing it to snap alongside the rating line.

    4. Take away the Extra

    As soon as the tile is damaged, take away any extra tile from the rating line. Use a pointy chisel or a grout remover to fastidiously scrape away the surplus items.

    5. Smoothing the Edges

    To attain a easy and completed look, use a sanding sponge or a grinding stone to easy the perimeters of the lower tile. Maintain the instrument at a slight angle and gently rub it alongside the sting in a round movement. Watch out to not over-sand or apply an excessive amount of strain, as this may injury the glaze on the tile. Here is a desk summarizing the steps for smoothing the perimeters:

    Step Instrument
    Sanding Sanding sponge
    Grinding Grinding stone
    Angle Slight angle
    Movement Round movement

    Scoring and Snapping

    Scoring and snapping is a way for reducing tile that entails utilizing a Dremel instrument to attain the floor of the tile after which snapping it alongside the scored line. This system is well-suited for making straight cuts and can be utilized on a wide range of tile supplies, together with ceramic, porcelain, and glass.

    Gear

    To attain and snap tile, you will want the next tools:

    Gear
    Dremel instrument
    Diamond reducing wheel
    Straight edge or ruler
    Security glasses

    Steps

    Comply with these steps to attain and snap tile:

    1. Mark the Slicing Line

    Use a straight edge or ruler to mark the reducing line on the tile.

    2. Connect the Diamond Slicing Wheel

    Connect the diamond reducing wheel to the Dremel instrument.

    3. Rating the Tile

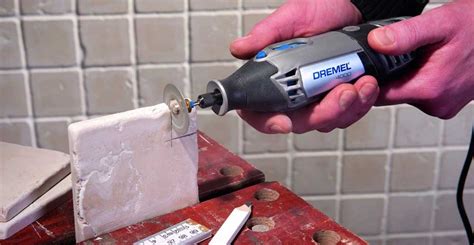
    Maintain the Dremel instrument at a 45-degree angle to the tile and rating the floor alongside the marked line. Apply mild strain and transfer the instrument slowly and steadily.

    4. Flip the Tile Over

    As soon as the tile is scored, flip it over.

    5. Place the Tile on a Flat Floor

    Place the tile on a flat floor, with the scored line aligned with the sting of the floor.

    6. Push Down on the Tile

    Apply strain to the tile on both facet of the scored line, pushing down till the tile snaps alongside the road. Use a easy, even movement and keep away from making use of extreme drive.

    Moist-Slicing for Precision

    For extremely exact cuts, wet-cutting is the popular methodology. This system entails utilizing a Dremel instrument with a diamond reducing blade whereas always lubricating the lower with water. This prevents the blade from overheating, which might result in untimely put on or injury to the tile. The water additionally helps to take away any mud and particles, leading to a cleaner and extra exact lower.
    .

    Supplies and Gear:

    Merchandise Description
    Dremel instrument A rotary instrument with variable velocity settings
    Diamond reducing blade A blade particularly designed for reducing ceramic or porcelain tile
    Water bottle or spray bottle To offer a continuing stream of water throughout reducing
    Security glasses To guard your eyes from particles
    Work floor A flat and secure floor to assist the tile

    Steps:

    1. Put on security glasses.
    2. Mark the specified lower on the tile.
    3. Place the tile on a secure work floor.
    4. Connect the diamond reducing blade to the Dremel instrument.
    5. Begin the Dremel instrument and set it to an appropriate velocity.
    6. Maintain the Dremel instrument regular and information it alongside the marked line.
    7. Constantly spray water onto the lower space to lubricate the blade and take away particles.
    8. As soon as the lower is full, wipe down the tile to take away any remaining water or particles.

    Grinding and Smoothing Edges

    As soon as the tiles are lower, it is important to grind and easy the perimeters to take away any tough or sharp surfaces. This may be performed utilizing the next steps:

    1. Put together the tile: Safe the tile firmly in place utilizing clamps or a vice.
    2. Choose the fitting grinding bit: Select a coarse-grit diamond grinding bit for eradicating bigger chips or imperfections.
    3. Begin grinding: Maintain the Dremel instrument at a 15-20 diploma angle to the tile floor and begin grinding alongside the sting.
    4. Use reasonable strain: Apply sufficient strain to grind the tile, however keep away from pushing too laborious, which might trigger injury.
    5. Management the velocity: Hold the Dremel instrument’s velocity at a medium setting to forestall overheating.
    6. Swap to a fine-grit bit: As soon as the bigger imperfections are eliminated, change to a fine-grit diamond grinding bit for smoothing the perimeters.
    7. Easy and polish: Maintain the fine-grit bit perpendicular to the tile floor and apply mild strain to easy the perimeters and take away any remaining scratches.
    8. Clear up: Use a mushy fabric or brush to take away any mud or particles from the tile and surrounding space.
    Grinding Bit Sort Objective
    Coarse-grit diamond Take away giant chips and imperfections
    High-quality-grit diamond Easy edges and take away scratches

    Prepping for Grout

    Upon getting efficiently lower your tiles utilizing the Dremel instrument, the subsequent step is to arrange them for grouting. Grout is a cloth that fills the areas between tiles and helps to seal them. For a professional-looking end, you will need to correctly put together your tiles earlier than grouting.

    Step 1: Clear the Tiles

    Use a humid sponge or fabric to wipe down the tiles and take away any mud or particles. Enable the tiles to dry fully earlier than continuing.

    Step 2: Masks Off the Grout Strains

    Apply painter’s tape alongside the grout strains to forestall grout from getting on the tile floor. Be sure that the tape is pressed down firmly.

    Step 3: Apply a Grout Launch Agent

    Apply a grout launch agent to the tiles and permit it to dry. This may assist forestall the grout from sticking to the tiles and make it simpler to take away any extra.

    Step 4: Combine the Grout

    Comply with the producer’s directions to combine the grout. Use a clear bucket and trowel to combine the grout till it reaches a easy consistency.

    Step 5: Apply the Grout

    Use a grout float to use the grout to the areas between the tiles. Press the grout into the joints and easy it out.

    Step 6: Take away Extra Grout

    After the grout has set for a couple of minutes, use a humid sponge to take away any extra grout from the tile floor. Work in small sections at a time.

    Step 7: Clear the Tiles

    As soon as the grout is totally dry, use a clear damp sponge to wipe down the tiles and take away any remaining grout residue.

    Step 8: Take away the Painter’s Tape

    Rigorously take away the painter’s tape from the grout strains. Use a pointy knife to chop the tape alongside the grout strains if needed.

    Step 9: Seal the Grout (Non-obligatory)

    To guard the grout from moisture and stains, think about making use of a grout sealer. Apply the sealer based on the producer’s directions.

    Security Ideas and Precautions

    1. Put on correct protecting gear

    • Security glasses to protect eyes from flying particles
    • Mud masks to forestall inhalation of ceramic particles
    • Gloves to guard fingers from sharp tile edges

    2. Safe the tile firmly

    • Use a clamp or heavy object to carry the tile securely in place
    • Make sure the tile is secure and won’t transfer throughout reducing

    3. Select the fitting reducing disc

    • Use a diamond-coated reducing disc particularly designed for ceramic tiles
    • Choose the suitable disc diameter for the thickness of the tile

    4. Use a information for straight cuts

    • Make use of a straight edge, ruler, or information rail to make sure correct and straight strains
    • Clamp the information to the tile or use a marking pen to create a reducing path

    5. Reduce slowly and punctiliously

    • Keep away from making use of extreme strain or shifting the Dremel instrument too rapidly
    • Enable the disc to chop via the tile progressively with out overheating

    6. Use water for cooling

    • Dip the reducing disc periodically into water to forestall overheating and extend its lifespan
    • This additionally reduces mud and makes the lower cleaner

    7. Clear the tile earlier than reducing

    • Take away any filth or particles from the reducing space to forestall the disc from clogging

    8. Verify the air flow

    • Guarantee satisfactory air flow within the work space to reduce mud publicity
    • Think about using a mud assortment system or fan

    9. Examine the instrument earlier than use

    • Verify the Dremel instrument, disc, and clamps for any injury or put on
    • Make sure the disc is securely hooked up and the instrument is in good working situation

    10. Concentrate on potential hazards

    • Sharp tile edges may cause cuts or punctures
    • Ceramic mud can irritate the lungs and eyes
    • Scorching reducing discs can burn the pores and skin
    • Overheating the instrument can result in injury or malfunctions

    Tips on how to Reduce Tile With a Dremel Instrument

    The Dremel instrument is a flexible energy instrument that can be utilized for a wide range of duties, together with reducing tile. Whereas it’s not as highly effective as a moist noticed, the Dremel instrument is a good possibility for reducing small tiles or making intricate cuts. With the fitting blade, you’ll be able to lower via ceramic, porcelain, and even glass tile.

    To chop tile with a Dremel instrument, you will want the next:

    • A Dremel instrument
    • A diamond-tipped reducing blade
    • Security glasses
    • Gloves
    • A mud masks

    Upon getting gathered your supplies, you’ll be able to comply with these steps to chop the tile:

    1. Put in your security glasses, gloves, and dirt masks.
    2. Connect the diamond-tipped reducing blade to the Dremel instrument.
    3. Place the tile on a flat floor and safe it with clamps.
    4. Maintain the Dremel instrument perpendicular to the tile and slowly start to chop.
    5. Use a lightweight contact and let the blade do the work.
    6. Upon getting lower via the tile, launch the set off and take away the Dremel instrument.

    You should utilize the Dremel instrument to make straight cuts, curved cuts, and even intricate designs. Simply you’ll want to use a pointy blade and take your time. With a bit of apply, it is possible for you to to chop tile like a professional.

    Individuals Additionally Ask About Tips on how to Reduce Tile With a Dremel Instrument

    Can you chop tile with a Dremel?

    Sure, you’ll be able to lower tile with a Dremel instrument. Nevertheless, you will want to make use of a diamond-tipped reducing blade. An everyday reducing blade will be unable to chop via the tile.

    What’s the finest Dremel blade for reducing tile?

    The most effective Dremel blade for reducing tile is a diamond-tipped reducing blade. Diamond-tipped blades are designed to chop via laborious supplies, reminiscent of tile, glass, and steel.

    How do you chop tile with a Dremel with out chipping it?

    To chop tile with a Dremel with out chipping it, it is advisable use a pointy blade and take your time. Use a lightweight contact and let the blade do the work. You may as well rating the tile earlier than you chop it to assist forestall chipping.